Role: Account Holder or Administrator |
DataManager™ customer accounts can be set up for OMR scanning when the contract is created or at a later time. Scanning options must be selected and saved before creating an OMR test event. While options may be edited at any time, edits apply only to test events created after the scanning options are saved.
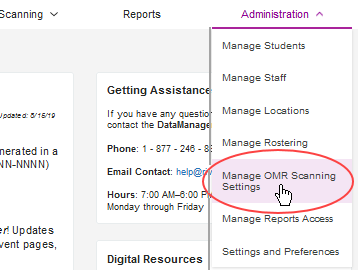
1. In the DataManager header, click Administration > Manage OMR Scanning Settings.
The Manage Optical Mark Recognition Scanning Options page opens.
.
2. In the Processing Type field, select one of the following options to specify whether the scanned documents are to be compared to the roster associated with the test event.
– Do not Validate Scanned Files against the Test Event Roster allows for the option to build a roster from an offline scanning session following the administering of a test; see Build Rosters from OMR Scanning.
Note: This option relies on information bubbled-in by students on answer documents and scanned into .dat files with header sheets used to divide classes or test groups into organizational hierarchies. When you select this option, all other fields become unavailable. Click Save to complete the task.
– Validate Scanned Files against the Test Event Roster allows for the validation of information on barcode labels that have already been created (see About Data Files and Rosters); allows for the remaining fields in this section and the Roster File/Answer Document Merge Rules sections to become available).
3. In the Bar Code Reading field, select one of the following options to specify whether barcodes are to be printed and used to identify the student information during scanning:
– Do not use the bar code reader on the scanner imports student data from the answer document rather than the barcode
– Use bar code reader on the scanner imports student data from the barcode label rather than the answer document.
Important: Select Use bar code reader on the scanner in all cases except when you need to add new students to the roster for testing. For these instances, change the selection to Do not use the bar code reader on the scanner, scan the answer document(s) separately, and then change the setting back to the default (Use bar code reader on the scanner ).
4. In the Bar Code Printing field, select an option to have the student identification number printed or hidden on the barcode:
– Do not Print Student ID Number on Bar Codes
– Print Student ID Number on Bar Codes
5. For the Bar Code Label Type field, select the label type you are using, either Avery® 5160, 48160, 48460, 48960 or equivalent (30 per sheet) or Avery® 5360 (21 per sheet).
6. If the Roster File/Answer Document Merge Rules section is available, specify for each field whether the roster file (barcode) or the scanned data from the answer document should be used to update student data.
7. Click Save to save the OMR scanning options. When test events are created for this account, the saved OMR scanning options are applied.
See Next: