Data Package: Online Testing |
Role: Account Holder, Administrator, or Teacher |
Note: To print answer documents, you need Adobe Reader. You can download a free copy from the Adobe website.
Review the following guidelines for printing and copying answer documents:
● Printing the master answer document:
– Use a high-quality laser printer (600 dpi or better).
– Do not create answer documents on an ink-jet or dot-matrix printer.
– Use multipurpose copy paper that meets the following specifications:
○ 8.5" x 11"
○ 20 lb plain white
○ non-recycled
○ 84-brightness or higher
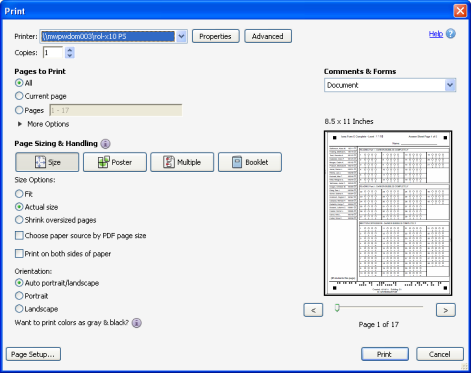
– When you print the answer document, verify that the Scale to paper size is set to No Scaling in the Print dialog box.
– When you print the answer document from Adobe Reader, verify that Size Options is set to Actual Size and Orientation is set to Auto portrait/landscape in the Print dialog box.
● Copying the master answer document:
– Use a high-quality copier set to print single-sided.
– Do not use a high-capacity, low-quality duplication system.
– Copies must be the same size as the original (not enlarged or reduced) and not distorted in any way.
– Use the scanner bed when copying by placing the answer sheet face down on the glass; do not use the auto document feeder.
– If the registration marks (the squares in the corners of the answer documents) are in the wrong positions or distorted, scanning may fail.
● Ensure the quality of the answer documents distributed to students. Be sure the answer documents are clean, crisp copies centered squarely on the page.
Note: Test assignments must be created at the building level to print answer documents for all students in multiple classes of the same grade.
1. Find the test event for which you want to print answer documents.
a. From the Assessments menu, click Test Events. The Test Events Overview page opens.
b. Click the name of the test event in the Test Event Name column or click Manage in the test event's row.
Note: If you don't see the test event name in the table, use the search filters and column sorting options to narrow your list of events. See Finding a Test Event for detailed instructions.
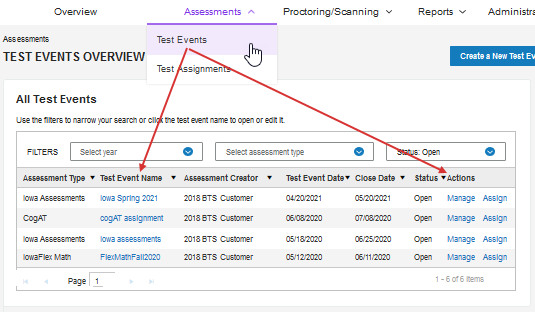
Your chosen test event opens on the Test Event page.
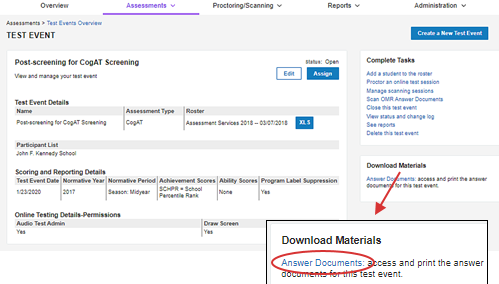
2. In the Download Materials box, click Answer Documents. The View Test Assignments page opens. The name of the location associated with the test event appears in the top Location field.
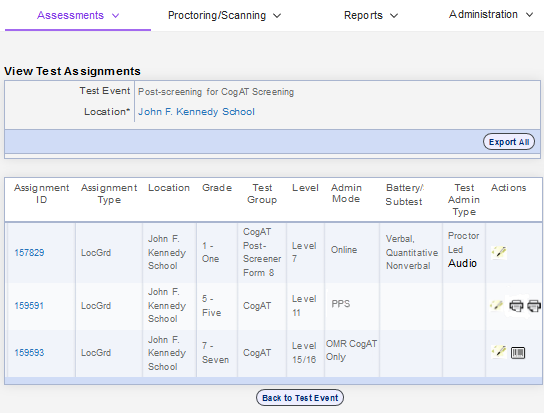
3. (Optional): To change the location:
a. Click the name of the current location to display the location hierarchy.
b. Click right arrows to expand the nodes on the hierarchy, down arrows to collapse them.
c. Select a district, building, or class location level. A list of assignments for that location appears in the table below.
Note: You must be associated with the building-level location in order to print answer documents.
4. Locate the answer document you want to print.
5. Do one of the following:
If you want to... |
Then... |
Print answer documents for all students in multiple classes of the same grade. |
In the Actions column, click the first printer button:
The answer document image appears in a separate window. The answer document displays the names of all students in multiple classes of the same grade on a single page. For example, if the school building has two classes for grade 3, the answer document displays the names of all the students in both of the classes for grade 3. |
Print separate answer documents for multiple classes of the same grade. |
In the Actions column, click the second printer button:
The answer document image appears in a separate window. The answer document displays a separate page for each class with the name of the class and the list of students for the class. For example, if your assigned location in the hierarchy is the district level and there are four classes for grade 2 in multiple buildings, the first page of the answer document displays the name of the class and the names of all the students in the first class for grade 2. The second page of the answer document displays the name of the class and names of all the students in the second class for grade 2, and so on. |
6. In your browser, click Print. The Print dialog box opens.
7. Verify the following print options:
– Set Print Quantity to the number of answer documents you want to print. Print one answer document per student, or print a single “master” answer document and make photocopies for all students who will be tested.
– Set Page Scaling to None.
– Select the Auto Rotate and Center box.
8. Click OK to print the answer documents.
9. To return to the Edit Test Event page, click Home in the left navigation menu and then click Please click here to go back to Test Event.

