After a child's record is entered in Data Manager, you can begin adding and viewing assessment information for the child.
1. Locate the child record in the system. See Searching Child Records for instructions on searching for existing child records.
2. Click the Test button in the row of the child's record.

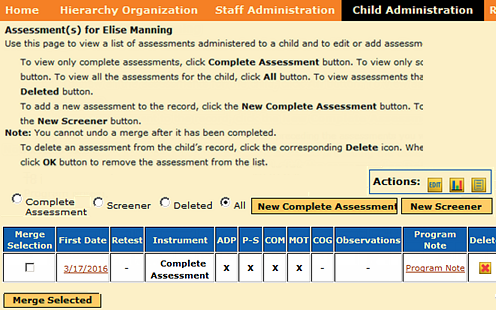
3. The Child Assessment page opens. Instructions for performing tasks appear at the top of the page, views and action items at the bottom. Any previously recorded tests for the child appear in a summary table.

4. Perform any of the following actions to view more information, add information, or organize a child's record:
– To add a new assessment to the child record, click the New Complete Assessment button or the New Screener button. Enter scores, test observations, and domain totals and save the child record. For details, see Adding a New Complete Assessment or Adding a New Screener.
– To merge two or more of the same assessments taken within forty-five (45) days, click the check boxes under the Merge Selection column and click the Merge Selected button.
Note: When two or more partial assessments are uploaded for the same child within a fifteen (15) day period, only one (1) ERF will be used. ERFs that are allocated from a higher level in the hierarchy will be used (“burned”) prior to ERFs that were purchased directly by that organization level. See About ERF and MDS Licenses.
– Use the Actions buttons to view child information (Edit, Reports, or Notes).
– Click the date of a test to see test results in a table, with domains, raw scores, and ranks.
– Filter the tests shown in the table by selecting the corresponding button (Complete Assessment, Screener, or Deleted; All is selected by default).