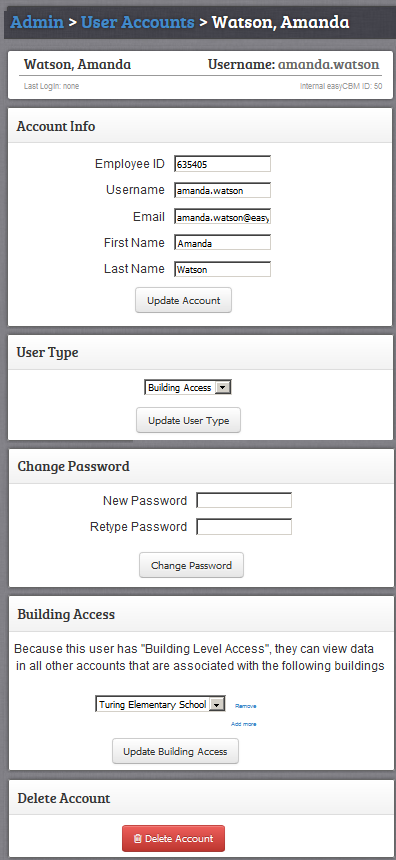
You can edit the following information on a user’s account page:
Employee ID
Username
First or last name
Account access
Password
Building associations
Important: If you change a user's information from a link on the Admin page and then later reload the import file (1_users.csv) without updating the same fields, the old information will override the new. To retain the edited information, you must also edit that information in the 1_users.csv file. If you are changing the Employee ID and you are editing students assigned to that Employee ID, you must also upload the 3_teacher_students.csv file with the updated information.
To edit an existing individual user account:
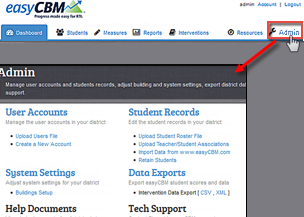
Click the Admin tab. The Admin page appears.

Click User Accounts. The User Accounts page appears and lists all users associated with the district.

You can sort the list by clicking any of the headings. Note the following:
Clicking once sorts the list by the column head alphabetically or numerically in ascending order. Clicking a second time changes the order to descending.
Clicking User Type sorts users by role.
Clicking Last Login allows you to find users who have recently logged on to easyCBM.
Navigate to a user and click his or her name. The user’s account page appears.

Refer to the following table.
If you want to edit the user’s… |
Then do this… |
Employee ID |
In the Account Info area: In the Employee ID box, type the new employee ID. Note: If you change a teacher’s employee ID, then you must update the 1_users.csv and 3_teacher_students.csv files with the new ID. See Associating Teachers and Students via File Upload. Click Update Account. A confirmation message appears and informs you that the user’s account information has been successfully updated. |
Username |
In the Account Info area: In the Username box, type the new username. Click Update Account. A confirmation message appears and informs you that the user’s account information has been successfully updated. |
In the Account Info area: In the Email box, type the new email. Click Update Account. A confirmation message appears and informs you that the user’s account information has been successfully updated. |
|
First or last name |
In the Account Info area: In the First Name box, type the new first name. In the Last Name box, type the new last name. Click Update Account. A confirmation message appears and informs you that the user’s account information has been successfully updated. |
Account access |
In the User Type area: Select the desired access level from the drop-down box. Click Update User Account. A confirmation message appears and informs you that the user’s user type has been successfully updated. |
Password |
In the Change Password area: In the New Password box, type the new password. In the Retype Password box, type the password you entered in the New Password box. Click Change Password. A confirmation message appears and informs you that the user’s password has been successfully updated. |
Building access |
To change an existing building access selection: In the Building Access area, select the desired building from the drop-down box. Click Update Building. A confirmation message appears and informs you that the user’s building access has been successfully updated.
To add additional building access: In the Building Access area, click the Add more link. A drop-down box appears prompting you to select a building. Click Update Building. A confirmation message appears and informs you that the user’s building access has been successfully updated. |
To remove a building access selection: In the Building Access area, click the Remove link next to the building you wish to remove access. The building access selection is removed. Click Update Building. A confirmation message appears and informs you that the user’s building access has been successfully updated. |