Create a test event
Data Package: Online Testing |
Role:
Account Holder or Administrator |
The process for creating test events for your assessments
is described below.
Note: Only users with the
DataManager roles of Account
Holder or Administrator can create and manage test events.
To create a Cognitive Abilities Test™ (CogAT®),
Iowa Assessments™, Logramos®, or IowaFlex™
test event:
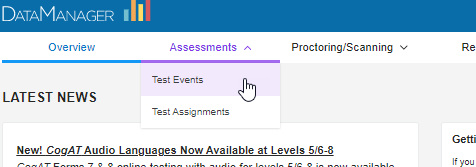
1. Click
the Assessments heading, then
select Test Events.
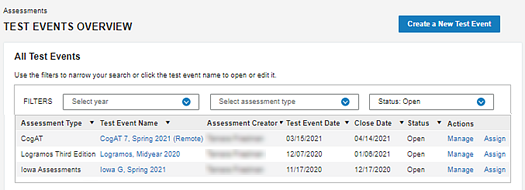
The Test Events Overview page opens to the All Test Events table, which defaults
to events that are currently open. Typically, your district will have
0-2 open test events at a time, one per assessment type, one season or
quarter at a time.
IMPORTANT:
Test events constitute the broadest grouping of test assessments, incorporating
locations, grades/levels, batteries/domains, and students. Create one
only per assessment type and testing period, and select the broadest possible
participant group and roster. If you see an open event with the same assessment
type as you are about to create, use that existing event rather than creating
a new one for the same testing period. An exception to this is when setting
up a Virtual Remote Proctor (VRP) test event in which some students do
not test remotely.
2. Click
the Create a New Test Event button.
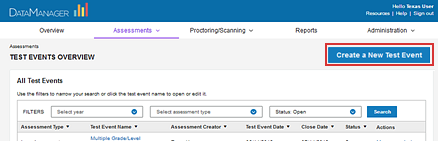
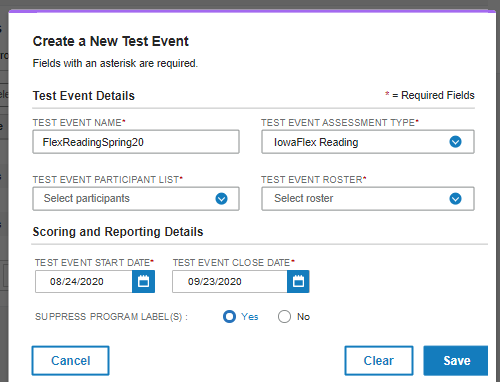
The Create a
New Test Event modal opens. Asterisks(*) denote required fields.
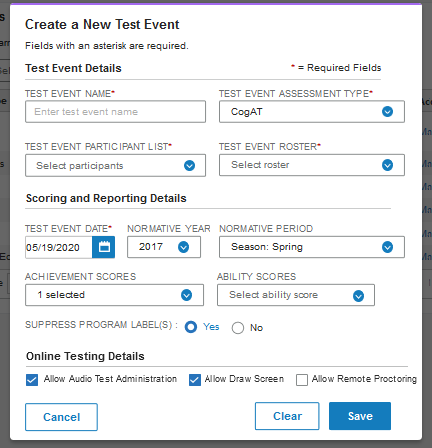
3. Enter
a unique name in the TEST EVENT NAME
field.
Tip: Use a naming convention
used across your institution that is easily recognizable when running
reports. For example: test family/form/season/year
(or, "Iowa G Fall 2020" or "CogAT 8 Spring 2021").
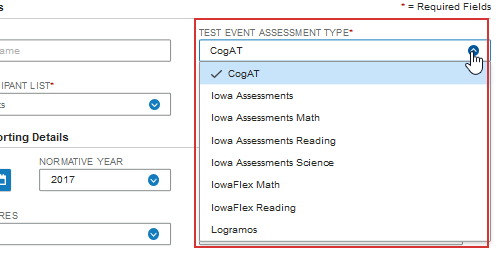
4. In the
TEST EVENT ASSESSMENT TYPE, select
the test that students will be taking.
Note: Options vary according
to which assessment types your system or district has purchased. The image
below shows all options (listed in alphabetical order).
The selection you make in this field determines, in part, which fields
are available in the rows below it. For the IowaFlex
options, the normative fields and Online
Testing Details sections are removed, and the modal is resized.
5. In
the TEST EVENT PARTICIPANT LIST, click
Select Participants to display
the location hierarchy. The list shows only those locations at or below
your location level.
IMPORTANT:
In most cases, you should retain the highest-level setting (the
default) so you do not inadvertently exclude a classroom or building of
students from appearing as options when you set up test assignments and
sessions. Use the below lettered steps only if you are certain that there
are groups you do not want to include in this event.
a. Click
the right-facing arrows to expand nodes in the hierarchy, the down-facing
arrows to collapse them.
b. Click
one or more check boxes to select the participant list. Typically, this
selection consists of one district. If, however, you have a subset of
schools or classes participating in testing, select only those buildings
or classrooms. Groups that are not selected will not be able to participate
in the newly created test event or any related assignments or sessions.
c. Click
outside the selection field to close the hierarchy.
6. In
the TEST EVENT ROSTER field, select a student
roster to apply to the test event. Note the following regarding test events
and rosters:
– Once
the test event is created, you cannot change the roster used for this
test event. However, students can be added or removed from the current
roster. See Adding
a Student to a Roster for instructions.
– See
Building
Rosters from OMR Scanning for information about building a roster
using the optical mark recognition (OMR) option. This is a unique designation
for OMR scanning when students and locations are not loaded into DataManager in advance of testing.
7. In the
Test Event Date box, type or use the drop-down calendar
to enter the date of testing. The date should occur midpoint between your
start and end date, with a maximum window of 60 days. See 
 test
event details for more information.
test
event details for more information.
Note: For IowaFlex
assessments, select a TEST EVENT START DATE
and a TEST EVENT END DATE rather than a
single midpoint date.
8. For
IowaFlex test events, keep or
change the default value for SUPPRESS PROGRAM
LABEL(S), then click Save to
finish setting up the test event.
For all other assessment types, continue with
the remaining steps.
9. For NORMATIVE YEAR, choose from the first two
options for online testing or select .

10. Select
a season or quartermonth for the .
(Options are based on the test event date you entered.)
11. (Optional)
Select options for this test event. Refer to the table below.
12. Click
to select or clear any of the Online
Testing Details that appear on the page. Selections vary according
to your previous specifications.
– Allow Calculator Use (Iowa
Assessments and Logramos
only) specifies whether a calculator will be available during online test
administration.
– Allow Audio Test Administration
specifies whether online testing with audio will be available during this
test event. Audio for Iowa Assessments
is in English, for Logramos in
Spanish, and, for CogAT, in English,
Spanish, or, if enabled during system administration setup, in one of
six additional languages (see CogAT additional audio languages).
– Allow Draw Screen provides the creator
of a test session the option of allowing students to doodle on a blank
screen while they wait either for a test to begin or for other students
to complete a test. If you select it, the test session creator can allow
or prevent students access to a doodle page. If you select Do
not allow Draw Screen, the test session creator does not see the
option for a doodle page. In this case, students will see a static screen
with their name on it and no drawing tools. For more information, see
Create
a Test Session.
– Allow Remote Proctoring allows you
to engage one of the remote proctoring solutions adopted by Riverside
Insights®.
13. Click Save. A message confirms
that the test event has been created, and the Create
a New Test Event modal closes.
The Test Events Overview page shows the newly created event in the All Test Events table.
Note:
DataManager prevents you from accidentally creating
multiple, overlapping test events, which can cause problems with reporting,
by checking for other open and/or closed test events in a specific
normative period. See these
guidelines for options on working with multiple test events within
a given normative period.