Data Package: Online Testing |
|
Role: Account Holder, Administrator, Teacher, or Proctor |
Note: If your students are testing on mobile devices, they may apply touch gestures to perform the tasks described below. For example, students will "tap" rather than "click" fields to select options and enter information.
1. Provide students with their individual credentials, which consist of either personal information as it appears on the roster (first name, last name, birth month and day) or a unique ID number (which also appears on the roster). A Teacher, Administrator, or Account Holder can Print student test tickets for an individual with the Proctor role to distribute to each student, either by pasting the information into an email or, if testing at a school or other site, by clipping the test tickets and passing them out.
2. Distribute the test session code by email, for remote users, or on a chalk board if students are testing on site.
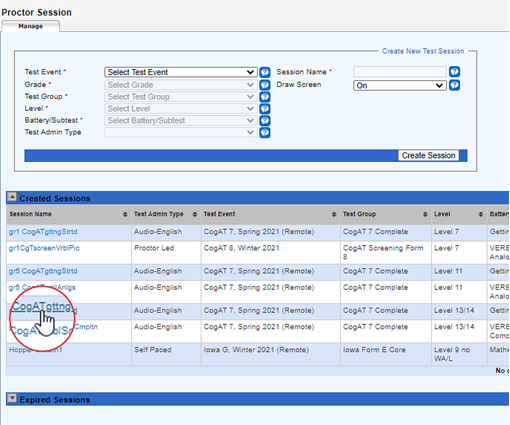
3. On the Manage tab of the Proctor Session page, click the name of the test session you will administer first.
4. Instruct students to sign in to the test.
a. Direct students to the student online testing app on their devices, where the student Sign In page appears. (Mobile device users must first launch the app and tap Take a Test to access the Sign In page.) For remote testing, provide the Sign In page's URL (riversideonlinetest.com) to students.
b. Have students sign in to their accounts.
○ Students using their names and birthdays to sign in must type their names exactly as they appear on their sign-in information slips or emails. After they fill in the First Name and Last Name fields on the Sign In page, have them use the calendar drop-down selections to ensure correct formatting of Birth Month and Birth Day.
○ Students using their unique student ID numbers must type those numbers exactly as they appear on their sign-in information slips or emails.
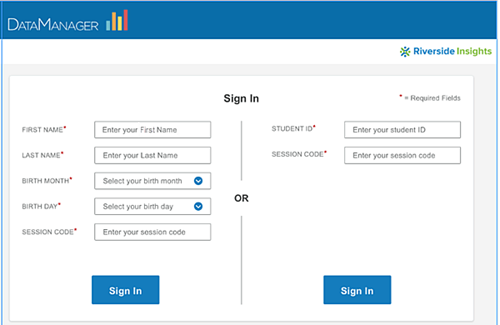
5. Tell students to type the session code into the Session Code field. The code cannot be copied/pasted.
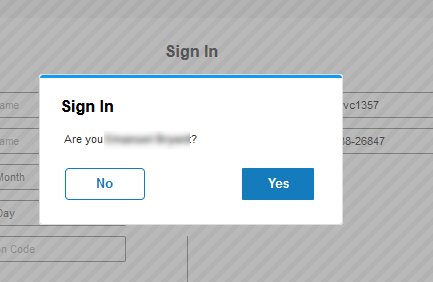
6. Tell students to click the Sign In button. The following verification box opens on the student's Sign In page. The name should match the student's name. (If it does not, see the troubleshooting tips below.)
7. Instruct
students to click Yes if their
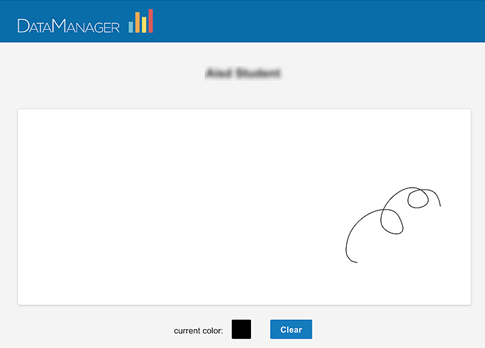
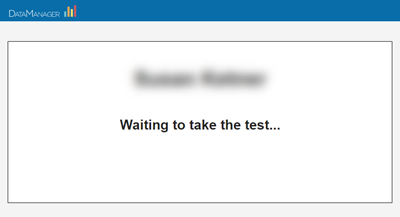
name is correct. If they do, they arrive at a waiting room page or a sketching
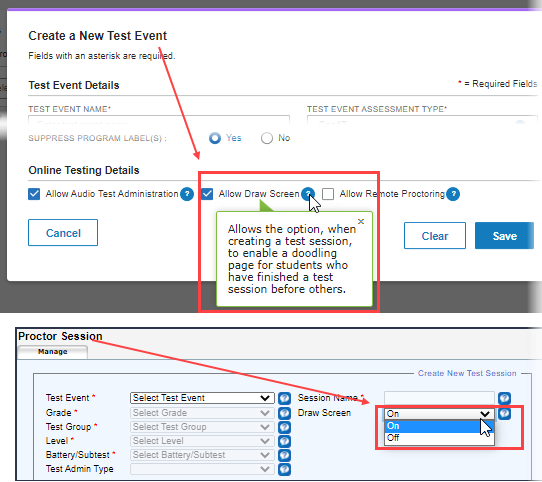
page, depending on ![]() whether
or not the sketching page (Draw Screen) was enabled for this test event
and session.
whether
or not the sketching page (Draw Screen) was enabled for this test event
and session.
Reminder: You must open the test session on the Proctor Session page in order for students to complete the sign-in. If you do not, students are sent back to the original Sign In page with the message that the Proctor must open the test session before students can sign in.
After students confirm their names, they appear in the Waiting for Approval section of your session tab.
Important: Names of students testing through one of the remote options appear briefly in the Waiting for Approval section, then jump down to the Approved Students section. See Additional setup steps for remote testing below.
8. Click the green check mark to approve a single student; use the Approve All button to approve multiple students, either in batches or when the entire group has signed in and is listed under Waiting for Approval.
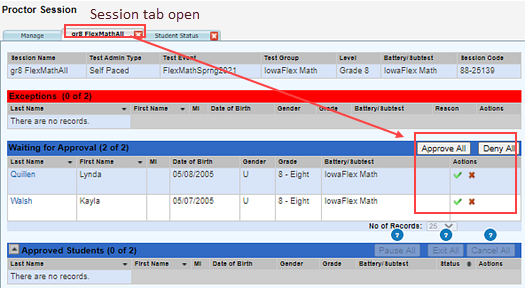
See detailed information about approving or denying students for testing. Once approved, the students are ready to begin the test.
Note: If students remain on the Draw Here or Welcome page for 40 minutes, their session times out, and they are redirected to the Sign In page. From there, they can sign in again using the same personal identification information and session code.
DataManager provides two integrated solutions for students taking assessments from home: DataManager Remote Proctoring Portal (DMRPP) and the Virtual Remote Proctor (VRP). Each of these requires additional setup steps to ensure test fidelity and student privacy, and each provides slightly different paths for
● Approving students to take a test
● Recording and flagging students during testing
● Reviewing recordings of students after they have finished taking a test
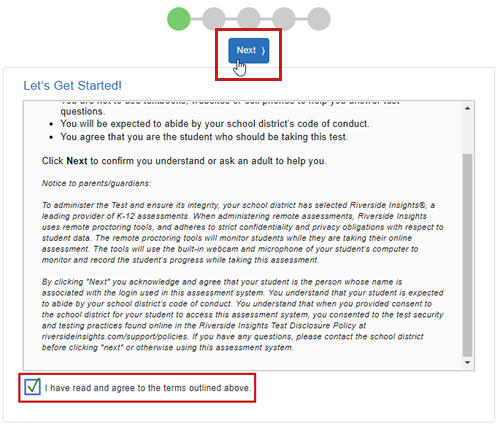
Students taking the test using the DMRPP are, upon successfully signing in, redirected to a DMRPP Welcome page. Here they perform a series of steps to ensure test privacy, security, and integrity.
Important: Young students may require help from an adult in the home to complete these agreements and checks.
1. Read the Terms of Use statement.
2. Click the check box to confirm that they have read and agree to the terms.
3. Click the Next button.
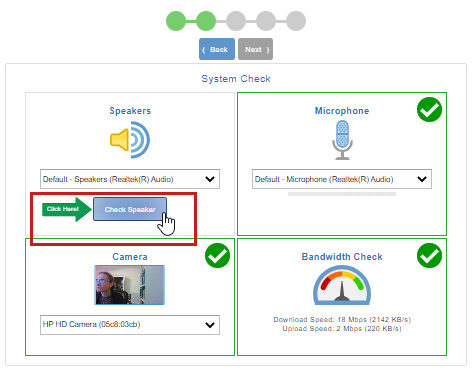
The System Check page opens, and DMRPP runs tests on the student's microphone, camera, and bandwidth to ensure they will be sufficient for testing.
Note: The bandwidth check takes several seconds longer than the others. Perform the next step while waiting.
4. In the Speakers card (upper left), students click the Check Speaker button to test their sound.
Their screens go dark, and they should hear a sound and see the following verification.
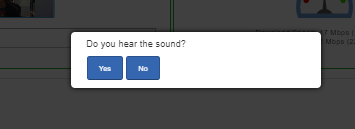
5. If the student clicks Yes, then the Speakers card displays a bright green check mark.
6. Once the bandwidth check is passed, and all four cards have green check marks in them, the student can click Next to perform the photo identity step.
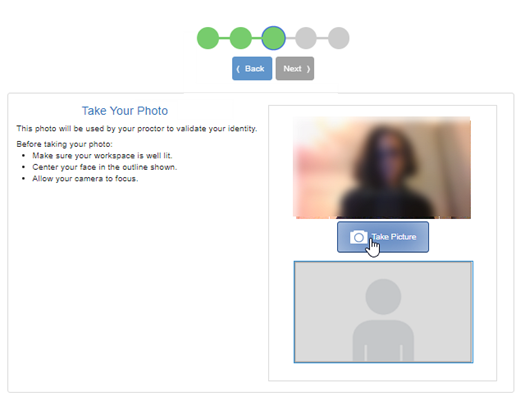
7. Have students follow the instructions on the page and click Take Picture. They can repeat this step before accepting a final photo for identification, and then click Next.
The student verification page opens.
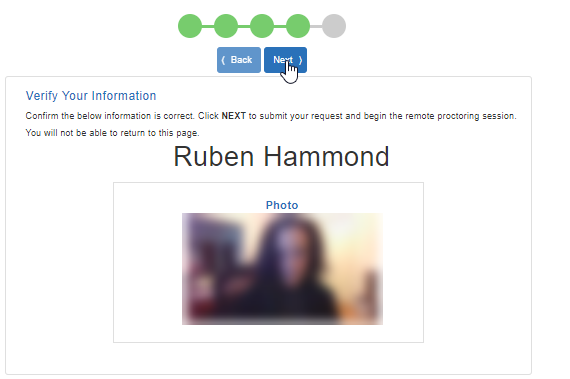
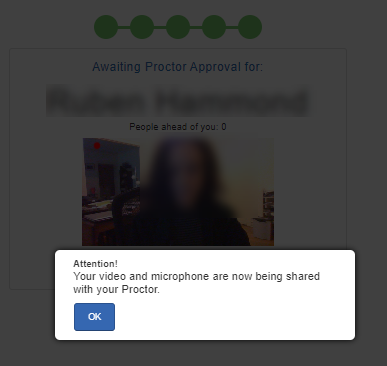
8. If the name and photo match the student's identity, the student clicks Next and is taken to the Awaiting Proctor Approval for... page. While there, a confirmation box reminds them that their video and sound are being recorded. They must click OK to continue.
Detailed step-by-step instructions, guidelines, and troubleshooting for installing and using Proctorio can be found by downloading and extracting the Virtual Proctor Playbook zip file. Extract the file to a designated folder and use the guides, as needed. Some are referenced below.
Important: Young students may require help from an adult in the home to complete these agreements and checks.
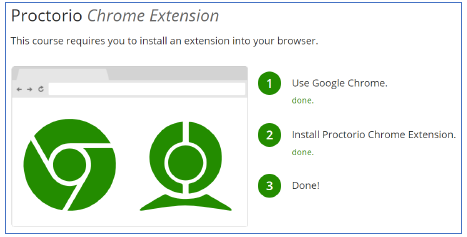
Students must have minimum equipment on their computers, including the latest Google Chrome browser and the Proctorio extension, as the first step in preparing to take a Proctorio test.
As soon as a student signs in to a DataManager test session, the VRP checks for the presence of the Proctorio Chrome extension on students' machines; if it does not exist, the system downloads and installs it before continuing with additional steps.
For detailed instructions, see the DataManager-Proctorio Set Up and Installation Guide.pdf in the Playbook.
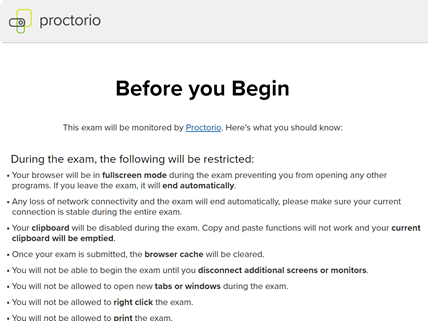
After the Proctorio extension is installed, the Before You Begin page opens in the student's browser. This page includes an explanation of restrictions that students can expect during the test, links to accessibility information, and final steps required for testing (for example, closing any additional browser tabs). See the PROCTOR Guide - Virtual Remote Proctor.pdf in the Playbook for detailed instructions. (Proctoring a test session begins on page 5; pre-check steps begin on page 6, step 4.)
.
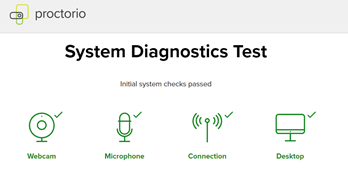
A system diagnostics test follows the initial preparations. Proctorio checks the student's system for adequate monitoring tools: webcam, microphone, connection, and desktop. Icons display in black initially, then change to green with a check mark as they pass.
As students continue following prompts for setting up their testing environment, note the following:
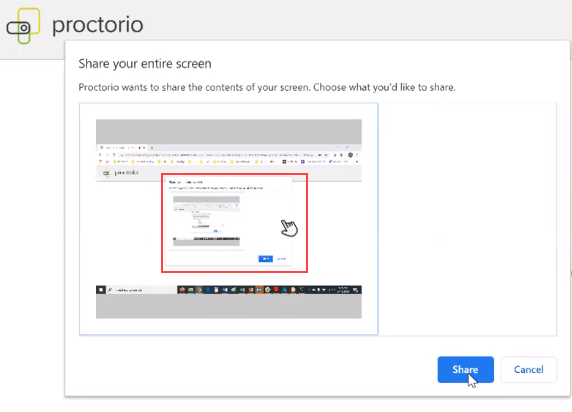
● On the Share your entire screen page prompt, students must first click the image of their screen, then click the Share button.
● A full room scan requires moving their computer cameras to capture the entire surroundings of the student.
If students are having trouble signing in using their names and birthdays, have them sign in using their unique ID numbers. These can be found by performing a search for students.
If a student's name appears in the Exceptions table of the Proctor page, click the link on the Exceptions bar to view detailed information and attempt to resolve the problem.
If a student still cannot sign in, verify the following:
● The student has not attempted to sign in to the test session before the Proctor has opened the test session. (In this case, the student receives the message: "The proctor has not started this test session. Please wait until the proctor starts the test session and then try to sign in again.")
● The student is signing in with either a unique name/birthday combination or a unique student ID number.
● The student is assigned to take the test, and to take it at the level being tested.
● The student has not already completed the test.
● If the student is taking part 2 of a two-part test, the student has completed part 1.
● For CogAT Screening and Post-Screener testers, the student is eligible to take the Post-Screener Form.
Note: A Post-Screener must
be administered within 30 days of the Screening administration. For example,
if you administer the Screening on September 15, you must administer the
Post-Screener between September 16 and October 15.
If you have questions regarding a student’s eligibility for taking a Post-Screener,
contact your administrator or test coordinator.