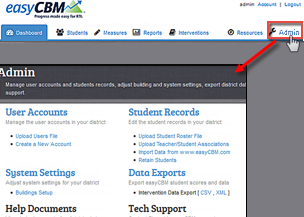
You can create individual user accounts through the Admin tab, Create a New Account link, which allows the creation of an individual user account without uploading a .csv user file. This is useful for quickly adding a small number of users.
Important: Any users you add through this method must be added to the 1_users.csv file the next time you upload that file to populate your user base. They must also be added to 3_teacher_students.csv, when users are matched with students.
To create a user account:
Click the Admin tab. The Admin page appears.

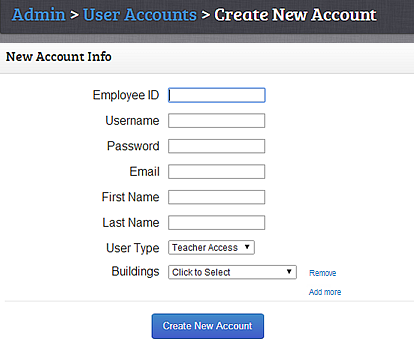
Under the User Accounts heading, click Create a New Account. The Create New Account page appears.

Complete the following information using data from your SIS, if available:
Employee ID
Username
Password
First Name
Last Name
In the User Type drop-down box, select the access level to assign to the user. If you do not select a value, Teacher-level access is assigned by default.
In the Building drop-down list, select a building to which the user will be assigned. You can enter more than one building for users who need to access records for more than one facility.
To add an additional building for access, click the Add more link. A drop-down box appears, prompting you to select a building. Select the additional building from the drop-down box.
To remove a building access selection, click the Remove link next to the building you wish to remove access. The building access selection is removed.
Click Create New Account. A confirmation message informs you that the user account has been successfully added.
Note: You can create another new account from the confirmation message. To add another user account, click Create Another Account. The Create New Account page appears. Repeat steps 3–5 to create the new account.
See also:
Creating New User Accounts via File Upload
Editing an Existing Individual User Account