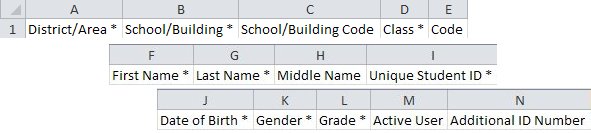
An example of the Student File Template in Microsoft Excel® is shown below.
Note: The template may not contain all of the fields shown in the example.
The following columns are required (indicated by the *):
● District/Area
● School/Building
● Class
● First Name
● Last Name
● Unique Student ID
● Date of Birth
● Gender
● Grade
The remaining columns are optional and do not require information. However, they must remain as column headers even if their values are empty.
You can either type the data directly into the cells of the template, or you can copy and paste data from another file into the template.
View descriptions of the columns in the Student File Template.
1. Open the Student File Template in Microsoft Excel.
2. Type or copy student data into the columns. Note the following:
– Do not delete columns from the template or change the header text.
– Enter only permitted values in the fields. See descriptions of columns and valid values for definitions, length limits, and special characters. Commas are not permitted.
– The District, School/Building and Class fields must be identical in all three data files (Location, Staff/User, and Student).
3. When you have finished adding data to the template, click File, and then click Save As. The Save As dialog box appears.
4. In the Save in list, browse, as needed, and select the directory where you plan to retrieve the file when uploading.
5. In the Filename box, type a name for the file. The file naming convention for a new student data file is as follows:
new_myrpcftpname_testfamily_student_mmddyy.csv
where:
– myrpcftpname is the username for the SFTP site on RPCFTP. Enter the username that was provided to the Account Holder in the Welcome Information email.
– testfamily is the test family name. Enter "default" if you plan to use this data file for more than one test family.
– mmddyy is the date you want associated with the data file, usually today’s date.
See File Naming Conventions for Data Files for more information about naming new data files.
6. In the Save as type list, save the file with a comma-separated values extension (.csv).
7. Click Save, and close the file. The file is ready to upload.
See Also: