The Proctor Session page contains all of the information, controls, and actions you need to administer online tests. Various tabs open and close depending on where you are in the testing process and whether you are delivering a proctor-led or a self-paced test.
The Manage tab is always present on the Proctor Session page.
When you first sign in and access the Proctor Session page, the Manage tab appears with a form for creating a new test session. To the right, a Student Lookup button takes you to a view of rostered students and the tests they have started, not yet started, or completed.
Account Holders and Administrators have an additional button, Add a walk-in Student, which gives them the ability to make a last-minute addition to the roster for testing. (See Add a Student to a Roster for directions.)
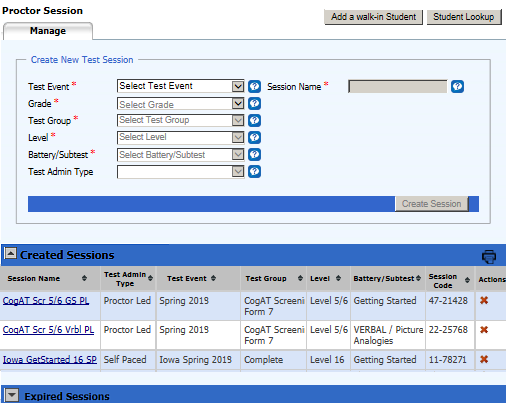
Below the Create New Session form, existing sessions appear under the Created Sessions heading. Clicking the name of the session in the Session Name column begins a test session. Clicking the x in the Actions column deletes the session. Any sessions that have expired are listed under the Expired Sessions heading. For an explanation of session duration, see About Test Sessions.
The session tab is launched when you click the name of a session in the Manage tab. It bears the name of the test session, and it allows you to approve or deny students for testing and to start the test.
Note: The example below assumes a self-paced test to be taken by three individual students.
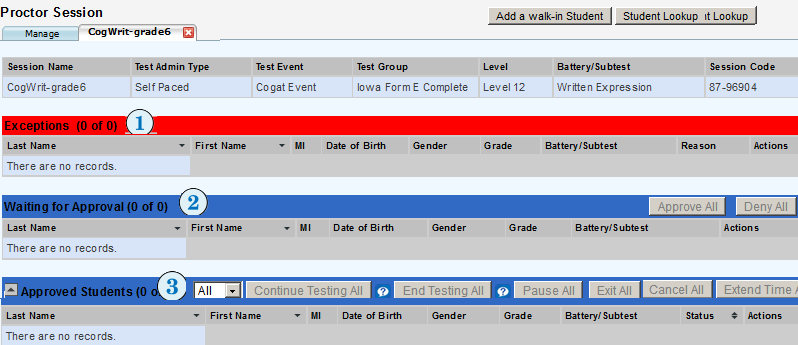
The session tab includes a session header, which contains information about the test sessions, and the following three areas containing student information:
|
Students appear in the Exceptions area if there is an issue with approving them for the test session. |
|
The Waiting for Approval area shows students who have signed in for the session and are waiting for approval to begin the test. |
|
The Approved Students area shows students who have been approved to begin testing. You can: |
|
● Monitor a student's status and see the question number the student is currently answering. ● Extend time for a test session. ● Pause or resume testing for an individual student or for all students in the session. ● Cancel testing for an individual student or for all students in the session. Note: These actions are laid out differently for proctor-led and multiple self-paced test sessions. See The_Proctor-Led Tab or Multiple Self-Paced Sessions/Merged Tab. |
When you select a session that is administered in proctor-led mode (designated in the Test Admin Type column of the Manage tab), the name of the session opens in a second tab, and the Proctor Led tab opens automatically as a third tab.
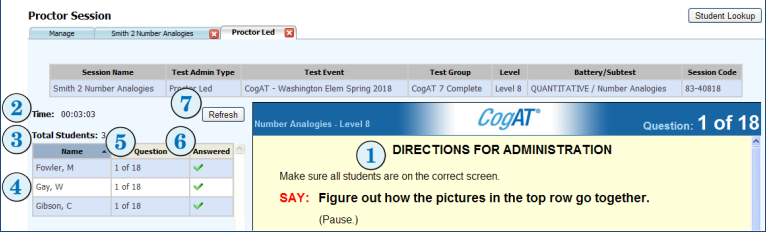
The Directions
for Administration area ( )
of the Proctor Led tab provides
instructions and text that you read to the students. The lower part
of the screen displays the item that students see. You may need to
scroll down to see the entire item.
)
of the Proctor Led tab provides
instructions and text that you read to the students. The lower part
of the screen displays the item that students see. You may need to
scroll down to see the entire item.
If you need more viewing space for the Directions for Administration area, use the F11 shortcut key to change your browser to full screen.
The Student area of the Proctor Led tab provides test status information for each student, enabling you to monitor progress during the test. The Student area includes the following information.
|
Elapsed time since the test started |
|
Total number of students in the test session |
|
Names of students in alphabetical order by last name |
|
Question number the student is working on |
|
Completion status of the current question;
a green check mark ( |
If test information is not displaying
correctly in the Directions for Administration
area, click the Refresh button
( ) to update the proctor's
test screen.
) to update the proctor's
test screen.
If student information is not displaying correctly in the Student area, click the browser Refresh button to update each column of student information.
Note: The appearance and position of the browser Refresh button may vary depending on the browser you are using.
![]()
![]() Multiple
Self-Paced Sessions/Merged Tab
Multiple
Self-Paced Sessions/Merged Tab
If you are administering self-paced tests, you can administer multiple tests simultaneously (see Open a Test Session for instructions on starting test sessions). Sessions can be different test levels and different test families; however, only self-paced tests—not Proctor-led—can be administered in multiple simultaneous sessions.
When you have opened one self-paced session and then open a second, the Proctor application automatically displays the Merged tab in addition to the individual tabs for each session. (In the example below, the Proctor has opened four separate self-paced sessions.)
The Merged tab allows you to view information and to perform most tasks for multiple test sessions, rather than switching between individual session tabs. For example, you can approve all students to begin testing in all sessions. However, you cannot enable students to continue to the next subtest in a series from the Merged tab.
The Merged tab displays session information for up to five self-paced test sessions.

The Merged tab includes a session summary table, which contains information for each test session, and the following three areas containing student information:
|
Students appear in the Exceptions area if they are ineligible to take a test for one of the following reasons: ● The student has already started or completed testing at a grade or level different from the level assigned to this test session. ● The student has already started/completed an assessment different from the assessment assigned to this test session. ● The student was assigned the session with audio, but the student’s previous session for the assessment was proctor-led. ● The student was assigned the session as proctor-led, but the student’s previous session for the assessment was audio. ● The student was assigned the audio session for a CogAT level 5/6, 7, or 8, but the language is different from that of the student’s previous audio session for the assessment. |
|
Students attempting to take the CogAT Post-Screening form appear in the Exceptions area if they are ineligible to take the test for one or more of the following reasons: ● The student completed the CogAT Screening form more than 30 days from taking the CogAT Post-Screening form. ● The student was assigned a different level in the CogAT Screening form and does not match the level assigned in the CogAT Post-Screening form. ● The student was assigned a different grade in the CogAT Screening form and does not match the grade assigned in the CogAT Post-Screening form. |
Note: Click the link in the Exceptions title bar to view a detailed Exceptions Report.
|
The Waiting for Approval area shows students that have signed in for the session and who are waiting for approval to begin the test. |
|
Once students are approved, their names appear in the Approved Students area. Students can start testing immediately after they have been approved. |
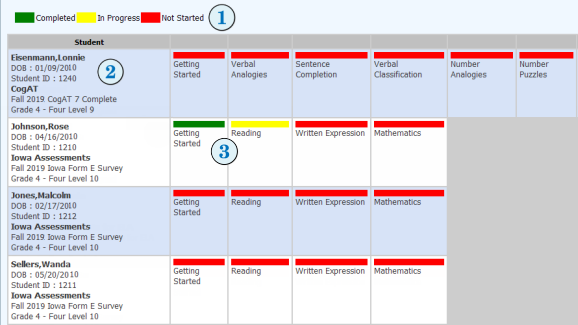
The Student Status tab provides access to detailed student information that can help to see the progress of students through their testing batteries. You can display one or more students on this tab. See View Student Status Information for instructions on searching for students.
|
A legend for the color coding in the table. |
○ Green – The student has completed the test.
○ Yellow – The test is in progress.
○ Red – The student has not started the test.
Note: The Completed status indicates that student testing is complete. Scored reports should be available soon.
|
Student and test data, including: |
○ First and last name, as spelled in the roster
○ Date of birth
○ Unique student ID
○ Test family
○ Test event name
○ Grade and test level
|
The student's assigned tests for the test event. |
See Also:
Approve and Deny Students for Testing
Pause and Resume a Self-Paced Test Session
Cancel a Self-Paced Test Session
Complete the Test Session and Send to Scoring
©2019 Riverside Assessments, LLC. All Rights Reserved.


